When you click on links to various merchants on this site and make a purchase, this can result in this site earning a commission. Affiliate programs and affiliations include, but are not limited to, the eBay Partner Network.
Hey all. Hopefully the pictures work for ya. 1965 F-350 Dually with a stakeside bed. Going to be rejuvenated as my farm truck, and cruiser. Only rust through on the driver side floor board, California for ya! Real solid truck. Everything is pretty pure on the inside, no holes in the dash or crazy wiring throughout...Wheels as I discovered after strumming through this sight are the non widow makers, Thankfully. Finding tires though was a bit tough & expensive for the 17.5 rim, but they ordered an on their way from summit Racing...When I bought the pickup it didnt run. Towed it home and charged the battery and it fired right up! It is a crate 390 that was put installed in 1997. PO claims less than 5k on it since then..owner since 82. Also a neat part is on the rear of the flat bed it has Ford printed in it! Is that a unique thing?
Questions
1. Does anyonee sell the fuse box, or are there any NOS out there? If not can I keep the same fuse box, but change out the rusty prongs that hold the glass fuse's in?
2. Does anyone make a dual master cylnder that mounts to the firewall with 4 bolts? All I have seen so far are two bolt MC. Or you can get a MC with A booster that has a 4 bolt hole bracket but I do not want that. Im a young 23 year old and enjoy stomping on the brakes, plus I dont want the big booster look under the hood.
3.In need of an Oil Bath air filter if anyone has one!
NumbersDummy may come up with NOS source that has been setting on the shelf for the past 50 plus years?
Tried using a rusted out 'fuse box' I had setting around to practice removing the rusty prongs and did not have any success. Eventually removed the box from the firewall then used a mild solution of a rust inhibitor, first on the backside and applied the solution using a small acid type brush, let it set, applied the solution again then used a brass wire brush, or sand paper to clean the wire contacts, let set, rinsed, then let dry. Repeated the same process on the prongs then added a dab of dielectric grease, wiped off excess and reinstalled, came out okay.
Depending upon how serious the rust, availability of replacement, may consider aftermarket fuse box; if the wiring harness are spindled and mutilated there are after market kits, I went with reproduction, most Ford part supplier's offer them, same wire color code and connectors, matter of unplug old and plug in the new. Anyhow, food for thought??
Like ND said... if it came before 57 it has Ford in a script font and would not be the correct bed for that 65 truck
Dave, with the wiring harnesses... I took mine out last week... it looks ok but seems like it may be an issue... I have yet to find a wiring harness for a 64 w/ 292... where did you get yours? Alot of places have generic ones or ones without the correct connectors. Maybe they have them for 64's also
Suggest sort and inspect the harnesses to determine which can be repaired, or need to be replaced. I did a 'do it myselfer' on my 65 dash harness, used plastic ties to keep the truncated circuits separated while I made repairs; if decide to make repairs suggest re-tape using harness wrapping tape, none adhesive, I used electricians tape for securing the end.
Another option is aftermarket kits, not familiar with them, depending upon brand member's have spoken highly of them. If considering adding additional circuits may want to consider, I was able to add a couple extra circuits but found that was about the limit.
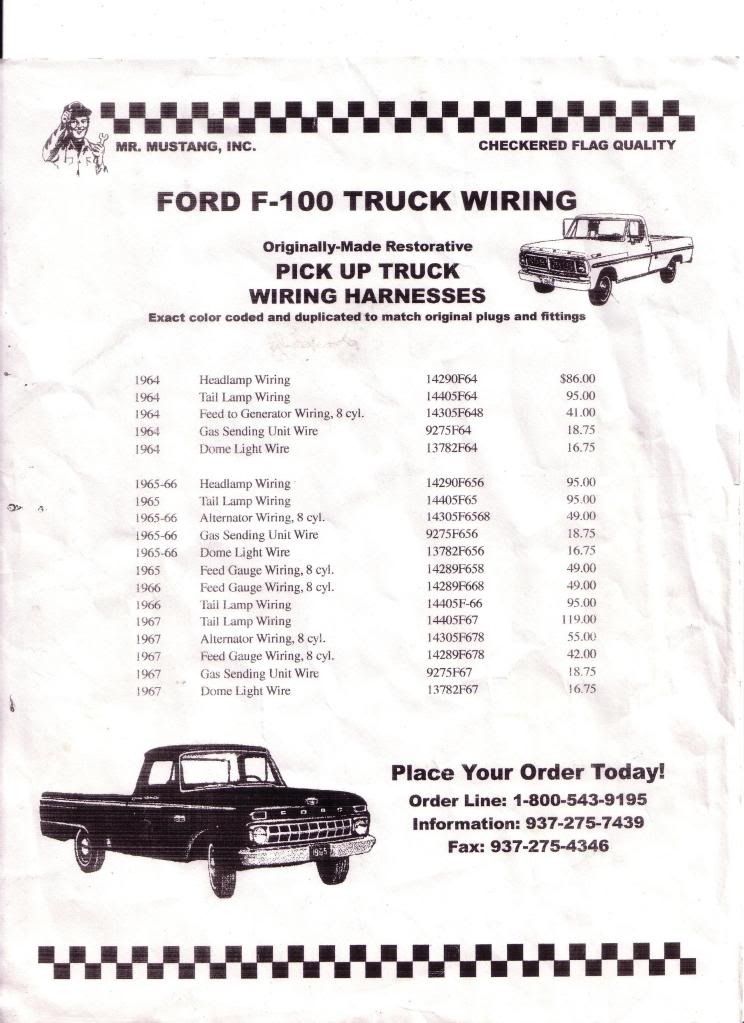
Majority of the Ford part supplier's now carry the reproduction, not sure they offer individual harnesses? Posting price list Mr. Mustang Inc. as example only, the harness purchased thru M&M were manufactured by American Autowire; who provide harness to Ford part suppliers, I was very pleased with the quality. This is an extremely outdated list, at least 15 years old, not sure they still offer the harnesses, tried to confirm today but the person familiar with the harness sales was not in. 1-800 543-9195 (ext. 112) Suggest compare prices, if order thru Ford part supplier suggest request wiring manual, if too expensive let them know intend purchasing directly from the source, Jim Osborn Reproductions for $7. Anyhow, enough of the rambling on.
So I need a little help...Trying to overhaul the rear drum brakes. Can any one tell me the tool needed to remove the rear lock nut or spindle nut? I have the axle shaft pulled out and the nut seems to be a size 2 1/2 inch possibly? Do they make a special socket that size?
And then once the lock nut is off, will the wheel bearings just slide out and then will I be able to remove the the rear Drum?
As you can see in Bill N D parts breakdown there is a nut then a locking washer and another nut, both nuts the same #. The correct wheel nut socket can usually be purchased from a H D truck parts store. Look at the first nut and see if part of the locking washer is bent over the first nut. You need to use a chisel or HD screwdriver and hammer to bend the lock part up straight so the nut can be removed. It is possible the lock is not bent over.
With no wheel nut socket on hand, using hammer and chisel, place the chisel against one of the points of the nut and hit the chisel to break the nut loose. The nut comes off counter clockwise looking at it. Once the nut is loose it will turn off with your fingers. Next, the lock has to come straight out toward you. You will see the lock has an inner tang that goes in a groove on the axle tube. Finally remove the inner nut, it should be finger tight, providing it was installed properly the last time is was apart. FYI it is the inner nut that adjusts the wheel bearings. You will need to adjust properly on reassembly. FYI again on later axles the the double nut and lock were done away with and a ESN was used, with a keeper that was placed on the tube groove and driven into the elastic of the ESN.
Thanks for The Breakdown! I will try first thing in the morning and see if I can find the correct socket. If I Used the hammer and chisel method, would I have to replace the nut? or would I be able to re-use it?
I am a little on the new side as I am unsure of what ESN means?
You need to get the chisel to bite into the nut at a point for the most leverage to get the nut to turn as you hit it and you will not ruin the nut, you can reuse it. If you get the correct socket, you can dress the nut clean on a grinder.
ESN stands for Elastic Stop Nut. The outer portion of the nut has nylon or some sort of elastic material the bites into the threads of the axle tube or a bolt and holds the nut there. I won't tighten or loosen.
So I need a little help...Trying to overhaul the rear drum brakes. Can any one tell me the tool needed to remove the rear lock nut or spindle nut? I have the axle shaft pulled out and the nut seems to be a size 2 1/2 inch possibly? Do they make a special socket that size?
And then once the lock nut is off, will the wheel bearings just slide out and then will I be able to remove the the rear Drum?
And it's a Dana 70..
Thanx all.
To remove the brake drum you don't need to remove the hub. Just take out the three big drum screws. The drum may be rusted stuck to the hub but it is separate from the hub.
You'll probably want new axle seals anyway so here's a link for the axle nuts on the Dana 70. Once there you can click the link to the special lock washer. Also, I was able to find the special rounded socket that you need. It's at home and I'm at work so I don't know the name on the socket. I'll try to remember to get the name and get back to you tomorrow.
The hammer/chisel method will remove the nut but you may booger the nut. Plus, to re-install you have to torque the inside nut (quite a bit...80 lbft or so) to preload the bearing, then back it off half turn, and then tighten it 20 or so inch pounds (or hand tighten with just the socket). Hope you can wait until you get the proper socket.

 04-18-2016 | 07:31 PM