03/ Early 04 ICP Swap
#1
03/ Early 04 ICP Swap
I know there's info in the tech folder and I wanted to add my $.02 after reading that and changing my sensor out..
I had fluctuating idle and an occasional romp along with a P2285 code.. That's a really good indication that the ICP sensor is going bad.. I went and got the part from a local Ford dealer(part #3C3Z-9F838-EA)..
I decided to get it from the top.. I've been underneath the truck enough to know my arms just don't fit up there in the area I needed to get to..
I diconnected the negative battery cables and pulled the intake from the back of the filter to the hard tube off of the turbo.. Then I drained some coolant and pulled the degas bottle..

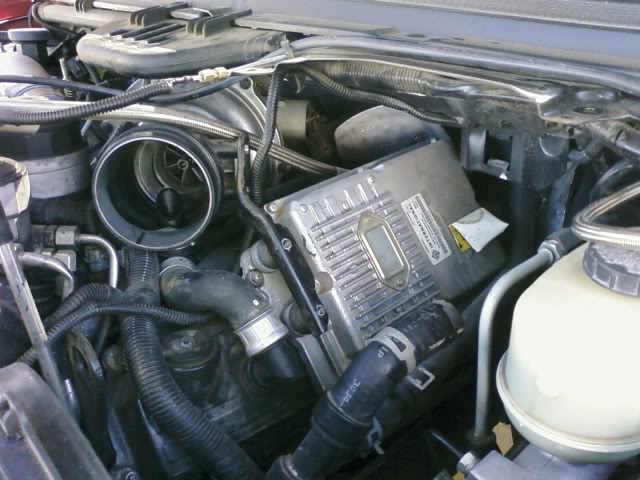
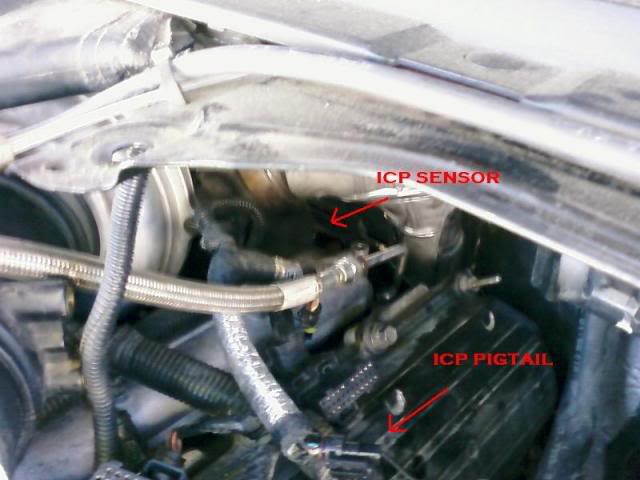
Next was the FICM.. Pulled the turbo inlet tube bracket, mounting nuts, and the connectors from the back of the FICM.. Then the four studs/bolts that hold the FICM bracket to the motor..Keep a telescopic retrieval magnet around, you'll need it..There's a ground from the FICM harness to the rear intake manifold stud..Disconnected that and the two rearmost DS injector clips to move a harness away.. Then I could see down into the hole where the ICP is located.. A long pick is really useful to disconnect the IPR and ICP connectors..Pull that harness out of the way once they're disconnected.. It sounds like a lot of disassembly, but this stuff comes off quick..

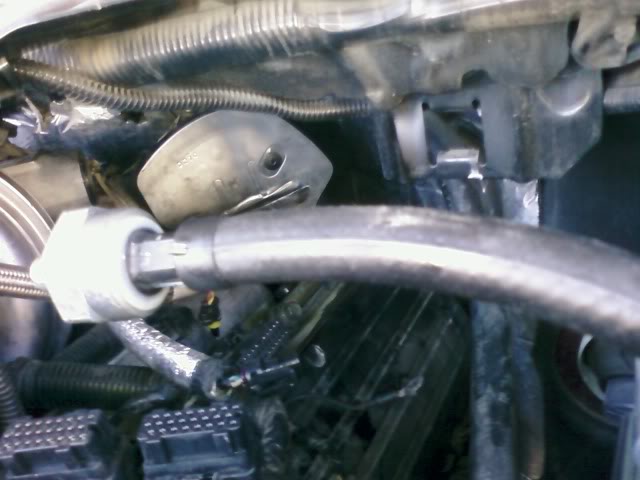
I cut down a 1 1/16" wrench to get the sensor loose.. I positioned it hanging over the rear turbo shield and used a couple of extensions to push up and break it loose from under the truck..Then it came out with the wrench, reaching around the back of the y-pipe, and finger tips in the hole.. Take the rear intake manifold stud out.. It really gets in the way..
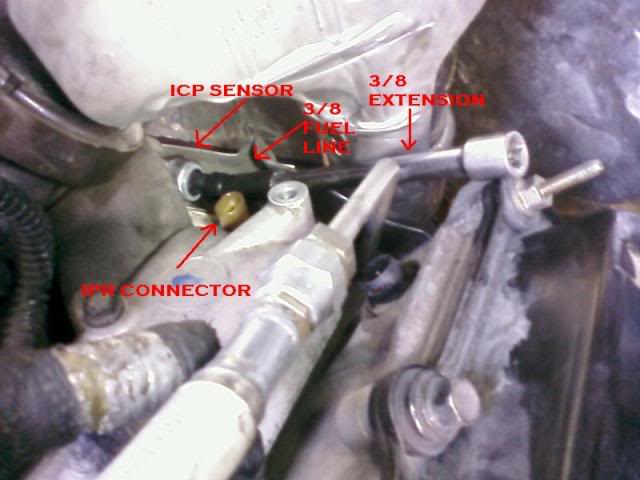
Once it was out, I was able to slip a bit of 3/8" fuel line into the end of the new ICP sensor connector and push a 3/8 extension into that to get it threaded back in the HPOP cover..


After I got the sensor tight, I plugged in the ICP and IPR connectors (pick is helpful here also).. My pigtail looked fine, so I cleaned it and let it go.. If I have to change that later, it's not that bad to get to.. The sensor was the worst part for me.. Everything else goes back together in reverse order..
A little fresh coolant to get the degas bottle to the right level and the truck started and idle was stable with no romps..
This isn't the easiest task to take on, but it isn't impossible from the top.. Find a soft pad and get used to laying on your motor..
I had fluctuating idle and an occasional romp along with a P2285 code.. That's a really good indication that the ICP sensor is going bad.. I went and got the part from a local Ford dealer(part #3C3Z-9F838-EA)..
I decided to get it from the top.. I've been underneath the truck enough to know my arms just don't fit up there in the area I needed to get to..
I diconnected the negative battery cables and pulled the intake from the back of the filter to the hard tube off of the turbo.. Then I drained some coolant and pulled the degas bottle..
Next was the FICM.. Pulled the turbo inlet tube bracket, mounting nuts, and the connectors from the back of the FICM.. Then the four studs/bolts that hold the FICM bracket to the motor..Keep a telescopic retrieval magnet around, you'll need it..There's a ground from the FICM harness to the rear intake manifold stud..Disconnected that and the two rearmost DS injector clips to move a harness away.. Then I could see down into the hole where the ICP is located.. A long pick is really useful to disconnect the IPR and ICP connectors..Pull that harness out of the way once they're disconnected.. It sounds like a lot of disassembly, but this stuff comes off quick..
I cut down a 1 1/16" wrench to get the sensor loose.. I positioned it hanging over the rear turbo shield and used a couple of extensions to push up and break it loose from under the truck..Then it came out with the wrench, reaching around the back of the y-pipe, and finger tips in the hole.. Take the rear intake manifold stud out.. It really gets in the way..
Once it was out, I was able to slip a bit of 3/8" fuel line into the end of the new ICP sensor connector and push a 3/8 extension into that to get it threaded back in the HPOP cover..
After I got the sensor tight, I plugged in the ICP and IPR connectors (pick is helpful here also).. My pigtail looked fine, so I cleaned it and let it go.. If I have to change that later, it's not that bad to get to.. The sensor was the worst part for me.. Everything else goes back together in reverse order..
A little fresh coolant to get the degas bottle to the right level and the truck started and idle was stable with no romps..
This isn't the easiest task to take on, but it isn't impossible from the top.. Find a soft pad and get used to laying on your motor..
#7
About 3 hours working time.. I looked for a 1 1/16" crowsfoot and couldn't find one on short notice.. That tool would have saved an hour of fumbling around with a wrench..
Dread changing it from the top too..
Thanks for the rep guys..
Thanks for the rep guys..
Trending Topics
#9
Great write-up!
I am currently faced with the P2285 code and wanted to double check the part number(s) prior to ordering. My truck is a 2004 (7/2003 build date) and it appears I am fortunate (insert sarcasm here) enough to have the rear location ICP sensor. Correct me if I am wrong, from what I have been reading it appears I will need the Sensor (3c3z-9f838-ea) and the Pigtail (5c3z-12224-a) to correct the problem.....are these the correct part #'s for my application?
Also, I found the sensor for $99.99 and the pigtail for $24.99 (+ S/H)..... does this sound reasonable?
Thanks in advance!!
#10
#14
Just to add my 2 cents worth, I helped a friend of mine change out his ICP on an early 03 production engine today. We took the front tires off, laid the front of the truck down then went after the ICP from the top. You can see the little bugger after getting rid of everything mentioned in the earlier post.
What I did. Go to Sears and grab a 1/2 inch drive 1/16 or 27mm deep socket, cut it down to size so the ICP just fits and you put no pressure on the electrical fitting. I bought a 1/2 drive deep socket and a 1/2 to 3/8 reducer (short), then coupled them up to a 3/8 universal joint and one long extension. To keep the universal joint from falling, I wrap the universal with electrical tape to keep it rigid but still flexes when needed.
Snap-On Deep socket would not work but the Craftsman socket fit just right. I used the hose trick to install, then slipped my custom socket on and tightened the ICP down.
#15
Just to add my 2 cents worth, I helped a friend of mine change out his ICP on an early 03 production engine today. We took the front tires off, laid the front of the truck down then went after the ICP from the top. You can see the little bugger after getting rid of everything mentioned in the earlier post.
What I did. Go to Sears and grab a 1/2 inch drive 1/16 or 27mm deep socket, cut it down to size so the ICP just fits and you put no pressure on the electrical fitting. I bought a 1/2 drive deep socket and a 1/2 to 3/8 reducer (short), then coupled them up to a 3/8 universal joint and one long extension. To keep the universal joint from falling, I wrap the universal with electrical tape to keep it rigid but still flexes when needed.
Snap-On Deep socket would not work but the Craftsman socket fit just right. I used the hose trick to install, then slipped my custom socket on and tightened the ICP down.
What I did. Go to Sears and grab a 1/2 inch drive 1/16 or 27mm deep socket, cut it down to size so the ICP just fits and you put no pressure on the electrical fitting. I bought a 1/2 drive deep socket and a 1/2 to 3/8 reducer (short), then coupled them up to a 3/8 universal joint and one long extension. To keep the universal joint from falling, I wrap the universal with electrical tape to keep it rigid but still flexes when needed.
Snap-On Deep socket would not work but the Craftsman socket fit just right. I used the hose trick to install, then slipped my custom socket on and tightened the ICP down.
Thanks Maximum4x4, I knew there had to be a way to do it with a socket somehow. Skyskidog223 is having trouble with his 2003 Excursion and I now firmly believe it's the ICP sensor. I'll get the parts together give your method a shot. Thanks again!


